Creating Single Mode Playlists
So far our design only works well with full albums or individual single tracks. But what about incomplete albums? Those would break the playlist layout to a more or less severe degree. Unfortunately incomplete albums are not uncommon. Just imagine a playlist with all songs from a specific year. A best-of album would certainly not appear there completely but the tracks showing up would still have the %tracknumber%, %album tracks% and %album% fields and would be recognised as part of a full album. Chances are that not only the visual layout would break but also vital information like the artist name would be missing. Remember, the only track the artists name is displayed for is the first track of the album.
Unfortunately we don’t have the possibility to deal with this problem on a single playlist. But we can have separate ‘album playlists’ and ‘single playlists’. While that’s not a perfect solution it works reasonably well. You just have to make sure to put incomplete albums on the right playlist.
Enable Playlist Tabs
By default Foobar2000 doesn’t show tabs for the playlists. To be able to switch easily between our album and single lists we first enable tab display. In fact, on all the screenshots tabs are already enabled.
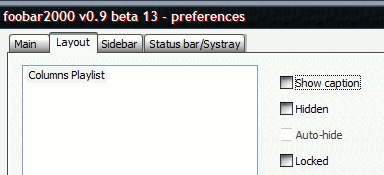
Go to the Display / Columns UI configuration page and activate the Layout tab, which looks like this:
- Right click on the Columns Playlist entry and choose Change base / Splitters / Playlist tabs.
- Click on the Playlist tabs entry and on the right side remove the tick from Show caption.
- Right click on the Playlist tabs entry and choose Insert panel / Playlist views / Columns Playlist.
- Apply the changes.
You should now have Playlist tabs as the root entry in the list and Columns Playlist as the only child.

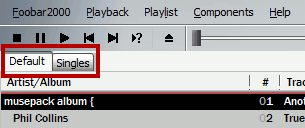
A new bar appeared above the playlist in the main window with a single tab reading Default. Each tab in this bar refers to a different playlist. Now right click on the existing tab, choose Create playlist, then right click on the new tab, select Rename and name the list Singles.
Restrict Existing Columns
For the single mode playlists we create a completely new set of columns. That of course means disabling the already existing columns for those playlists. We set this up on the Columns tab of Design / Columns UI / Playlist view. For each column the two options Playlist filters and Filter playlists are available.
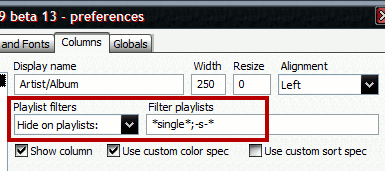
What we want to do with our columns is Hide on playlists that are single mode. The modes are triggered by the playlist’s name according to the filter string in Filter playlists.
Our design shall switch to single mode when the word single appears anywhere in the playlist name or the name starts with -s-. The appropriate filter string is this one:
*single*;-s-*
Joker signs are used in exactly the same way as in Windows in general. Meaning the asterisk (*) stands for any number of characters, including none. The question mark (?) stands for exactly one arbitrary character. Multiple conditions can be separated by a semicolon (;). Note that filter strings are not case sensitive.
Our string first applies to all playlist names including the word single with any number of characters in front or after - that’s just another way of saying anywhere in the complete name. The semicolon ends this condition and starts a new one, that applies to all names starting with -s- followed by any number of characters.
If you want maximum freedom for your playlist names, just use asterisk, space (* ) as filter string. Then any playlist name ending in a space triggers single mode, the rest is album mode.
Now change the Playlist filters combobox to Hide on playlist for all five existing columns and enter the filter string every time. When you click apply and look at the new Singles playlist, all columns have disappeared. However they are still displayed on the Default list.
Creating Single Mode Columns
We’re going to create five new columns for the single mode playlists, that also shall show up only on those lists. Therefore now the correct Playlist filter is Show only on playlists with the same filter string as above. Don’t forget to set this up for each of the columns.
The Artist Column
Create a new column called Artist, set Width to 230 and Alignment to Left. The information displayed is of course the artist name. The script for the Display tab looks accordingly.
[%artist%]
The colours are white text on an alternating black and dark grey background with dark red selected lines. As that’s exactly what the global colour script does, we don’t need a custom Style script.
The Title Column
For displaying the track title create a column called Title, make it 240 pixels wide and left aligned. In this column we also show the playback animation created earlier, which makes for a little more complex Display script.
$if(%isplaying%
,
$ifequal($put(foo,$mod(%_time_elapsed_seconds%,8)),0,
'))))  ',
$select($get(foo),
$get_global(cTxtDim)'('$rgb()')))  ',
$get_global(cTxtDim)'(('$rgb()'))  ',
$get_global(cTxtDim)'((('$rgb()')  ',
$get_global(cTxtDim)'((((  '$rgb(),
')'$get_global(cTxtDim)'(((  '$rgb(),
'))'$get_global(cTxtDim)'((  '$rgb(),
')))'$get_global(cTxtDim)'(  '$rgb()
))
)

%title%
The major part is the same script as in the album mode tracknumber column. The only changes are two spaces following the animation to separate it from the actual track title and the trailing $rgb() to ensure switching back to default text colour.
For this column we also need a custom Style script, because its desired look is the same as for the album mode track column: black on light grey, the red selected indicator and dark grey background for the playing song. Actually, this column is the only one requiring custom colours.
$set_style(text,$get_global(cTxtTrk),$get_global(cTxtSel))

$if(%isplaying%
,
$set_style(back,$get_global(cBgPlay),$get_global(cBgPlay))
,
$set_style(back,$get_global(cBgTrk),$get_global(cBgSel))
)
The first line changes the text colours, the rest takes care of the backgrounds: first the one for playing songs and at last the one for all others. When adding the script, don’t forget to tick Use custom color spec.
The Album Column
This column displays album name, tracknumber and discnumber. Call it Album and make it 160 pixels wide and left aligned. The Display script is quite straight forward.
['('%tracknumber%') ']
[%album%][', CD '%disc%]
First comes the track number enclosed in brackets. I abandoned the hexadecimal display for the same reason I did it for the systray tooltip. After the number follows the album name and the number of the disc for multi-disc albums. The square brackets around every item ensure it only being displayed when present.
The Time Column
Create a column called Time, 50 pixels wide and right aligned this time. Its Display script is identical to the corresponding album mode one.
$if(%_time_remaining%,
'['%_time_remaining%']',
$if2(%_length%,'n/a')
)
It usually shows the track length or ‘n/a’ and for the playing track its remaining time. Again, no custom colours are necessary.
The RGain Column
This column is called RGain, 50 pixels wide and right aligned. The script is a simpler version of the album mode one. The album gain part is missing because on a playlist dedicated to single tracks, album gain would seem a little out of place.
$if2(%__replaygain_track_gain%,'n/a')
Done
Stage 5 is done. And at the same time we finally have a completely finished and ready to use Columns UI design. So here again is a screenshot of the finished Dark Connections, this time in single mode.

If you don’t already have it ... hm, of course you have it. You’ve just finished it yourself... Whatever... ;) Just grab the FCS file as well: Dark Connections 2.0.0.