Creating the Colour Scheme
In this chapter we’re going to add a layer of colour to the textual information. This colour scheme will be built in a way to make it very easy to add additional colour schemes later just by defining all necessary colours in a single place.
First we define an initial set of colours. Of course, usually you wouldn’t define every single colour right before coding the colour scripts. It’s impossible to know everything you need beforehand. I’ll show the complete definitions in one go to avoid a confusing hopping back and defining new colours all the time.
Defining the Colours
Go to the Globals tab of Columns UI’s Playlist view configuration and activate the Variables tab on that page. There are already some lines here: our check for album tracks. Add the following lines to the window.
// --- Define colours ---
// Text
$set_global(cTxtStd,$rgb(255,255,255))
$set_global(cTxtSel,$rgb(255,255,255))
$set_global(cTxtTrk,$rgb(0,0,0))
$set_global(cTxtVA,$rgb(126,16,16,220,129,129))
$set_global(cTxtVA1,$rgb(220,129,129,220,129,129))
$set_global(cTxtVAPlay,$rgb(126,16,16,126,16,16))
$set_global(cTxtDim,$rgb(160,160,160,160,160,160))
$set_global(cTxtPlay,$rgb(255,255,255))
You should already be familiar with the $set_global() function defining global variables for the whole design. Here we use the function in combination with $rgb() to setup our colours. $Rgb() takes three arguments, consisting of the red, green and blue component of the colour. This is the usual way to define colours in the RGB colourspace used by computer screens. Below the input window is a ... button (next to the Tools button) leading to a standard Windows colour selection dialogue. Let’s have a look at the individual colours.
cTxtStd: The standard text colour. 255 is the highest value possible for each of the three colour components; three times 255 means bright white.
cTxtSel: The selected text colour. Used for the selected lines in the playlist.
cTxtTrk: Text colour for the Track column. Black. It will get a light grey background, so white text is useless. We also use this for the first five lines of an album in the Album/Artist column. Remember, these are the lines containing text.
cTxtVA, cTxtVA1, cTxtVAPlay: Text colour for artist names in the Track column. For various artists albums we put the info about the track’s artist in the Track column. This colour distinguishes artist and song name. Also, these $rgb() functions have six arguments. This is a way of defining two colours at once. The first three arguments refer to the text colour, the second three to the selected text colour. Here it’s a dark red for normal text and a lighter red for selected text. See the following chapters for the differences between the three variables.
cTxtDim: Light grey text colour for the dimmed zeros in the tracknumber column.
cTxtPlay: Text colour to highlight the currently playing song. We won’t need it until the next chapter.
// Background
$set_global(cBgStd,$rgb(0,0,0))
$set_global(cBgSel,$rgb(126,16,16))
$set_global(cBgTrk,$rgb(200,200,200))
$set_global(cBgAlt,$rgb(25,25,25))
$set_global(cBgPlay,$rgb(150,150,150))
The above is the next part of the script defining background colours. Add it to the Variables window as well.
cBgStd: Standard colour for the background. Black.
cBgSel: Background colour of selected lines. It’s the same dark red as cTxtVA.
cBgTrk: This is the above mentioned light grey background for the Track column.
cBgAlt: Alternative dark grey background colour. We’ll use it for a feature most people are crazy about: iTunes like alternating colour lines.
cBgPlay: Medium grey background for highlighting the currently playing song. Like cTxtPlay not used until the next chapter.
// Frames
$set_global(cFrmStd,$rgb(255,43,43))
This line defines the medium red colour of frames. Those are the borders of a playlist cell - if you divide each playlist line by column, you get a cell structure like in a spreadsheet programme. Each border of such a cell can have a coloured frame. We use this mainly to draw lines between albums.
Creating the Global Colour Script
Change to the Style tab. Here we enter the colour script applying to all columns.
The command to set colours is called $set_style(). We use it to define the text colours first.
$set_style(text,$get_global(cTxtStd),$get_global(cTxtSel))
The text instructs Foobar2000 to use the following colours as text colours. Then we access our global variables for standard text and selected text. Next step is setting the background colours.
$set_style(text,$get_global(cTxtStd),$get_global(cTxtSel))

$set_style(back
,$ifequal($mod(%_playlist_number%,2),0,$get_global(cBgStd),$get_global(cBgAlt))
,$get_global(cBgSel)
)
The system is the same as above. We use back to specify background colour mode and then list the actual colours. Be careful when breaking up $set_style() commands like here. The commas must stand at the beginning of the line! Analogous to text colour mode the colours given are default and selected background colour.
The long line with the $ifequal() statement achieves the popular iTunes like alternating colour lines. Let’s look at this in a little more detail.
$set_style(back

,$ifequal($mod(%_playlist_number%,2),0,
$get_global(cBgStd),
$get_global(cBgAlt))

,$get_global(cBgSel)
)
Because Tagz works on a line by line basis only, figuring out the background colour of the previous line is impossible. In fact the only thing we have to identify a certain line in a playlist is %playlist_number% which simply counts the lines from top to bottom.
Instead of saying Use different colour than previous line we use the line number and say Use black on all even line numbers and dark grey on all odd ones. The result is the same.
The means to identify odd and even numbers is the $mod(x,y) function, that divides x by y and returns the remainder of the division. E.g. 11 divided by 2 is 5 and a remainder of 1. $Mod() would return 1. By dividing the line number by two and looking at the remainder, we can tell odd and even lines apart.
$Ifequal() checks for the remainder to be zero - which is true for all even numbers - and sets the background colour to cBgStd: black. Otherwise we use the dark grey of cBgAlt.
And this concludes the global colour script. Everything else will be done making adjustments in the individual columns. But before that we set up some other global values.
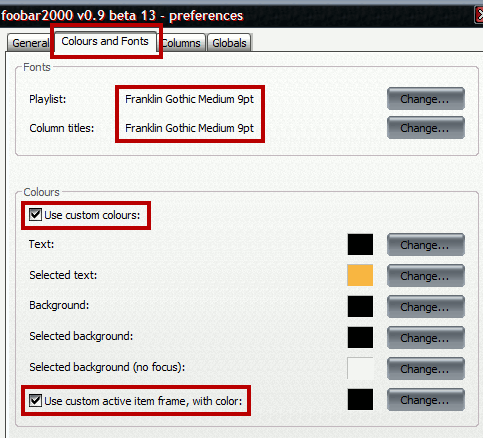
Go to the Colours and Fonts tab and Change both Fonts to Franklin Gothic Medium, 9pt (or whatever you like better). Then tick Use custom colours and set Background to black. This ensures the remaining playlist background to be black, when only a few tracks are in a list.
Also tick Use custom active item frame and set it to black as well. This defines the colour of the frame around the currently selected playlist entry. Usually it just inverts whatever background colour it finds, and this would look ugly for our design.
The Artist/Album Column
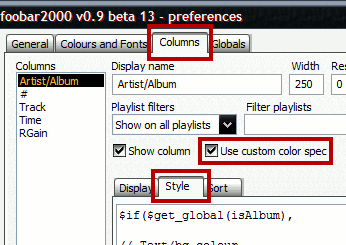
Go back to the Columns tab, select the Artist/Album column and activate the Style tab. Like on the Globals tab this is the place to enter the colour script. But this one here only affects the selected column. We even don’t need to define the complete scheme again, because Foobar2000 automatically applies the global values for the colours we don’t mention explicitly. To instruct Foobar2000 to use the column colour script, tick Use custom color spec.
The Artist/Album colour script looks quite complex on first glance. And indeed we have to do a lot in this column. Once again have a look at the screenshot of the finished design. Following is a list of what we need to do.
- White text on black background and red top frame for the first track of an album.
- Black text on grey background for tracks two to four of an album.
- White text on black background and red bottom frame for the fifth track of an album.
- Black background and red right frame for all other tracks of an album.
- Additionally red bottom frame for the last track of an album.
- No indication of selected album tracks. That is the task of other columns.
- For single tracks red right frame. The rest is taken over from the global colour script.
The first part of the script takes care of text and background colours.
$if($get_global(isAlbum),

// Text/bg colour
$ifgreater(%tracknumber%,4,
$set_style(text,$get_global(cTxtStd),$get_global(cTxtStd))
$set_style(back,$get_global(cBgStd),$get_global(cBgStd))
,
$ifequal(%tracknumber%,1,
$set_style(text,$get_global(cTxtStd),$get_global(cTxtStd))
$set_style(back,$get_global(cBgStd),$get_global(cBgStd))
,
$set_style(text,$get_global(cTxtTrk),$get_global(cTxtTrk))
$set_style(back,$get_global(cBgTrk),$get_global(cBgTrk))
))

)
You should be familiar with the used functions by now, so I’ll keep this short. The $ifgreater() takes care of album tracks from tracknumber five onwards. Its otherwise part consists of a $ifequal() function testing for track one. The colour assignments are the same for both and it would have been possible to put them into a single $if() statement. But like this it’s easier to read and edit. Finally the last two $set_style() apply to the grey-background tracks two to four.
The second part of the script defines all necessary frames.
$if($get_global(isAlbum),

[...]

// Top & bottom border
$ifequal(%tracknumber%,1,
$set_style(frame-top,1,$get_global(cFrmStd)),
$ifequal(%tracknumber%,5,
$set_style(frame-bottom,1,$get_global(cFrmStd)),
$ifequal(%tracknumber%,%album tracks%,
$set_style(frame-bottom,1,$get_global(cFrmStd)),
)))

// right border
$ifgreater(%tracknumber%,5,
$set_style(frame-right,1,$get_global(cFrmStd))
,)

)
The first three $ifequal() check for first, fifth and last track of the album and set the frame colour. The $set_style() used here is a little different than the one used for text and background colour. In general it looks like this:
$set_style(frame part,onoff,colour)
Frame part refers to the location of the frame and can be either frame-left, frame-right, frame-top or frame-bottom.
Onoff is either 1 for turning the frame on or 0 for turning it off. In the latter case we leave out the colour part.
Colour of course stands for the frame’s colour.
Since we didn’t define frames in the global colour script, turning anything off is not necessary. We simply activate the needed frames, the $ifgreater() on the bottom taking care of the right-side frame for tracknumbers five onwards.
Albums are properly taken care of now, which leaves a last line for single tracks. Here is the full script.
$if($get_global(isAlbum),

// Text/bg colour
$ifgreater(%tracknumber%,4,
$set_style(text,$get_global(cTxtStd),$get_global(cTxtStd))
$set_style(back,$get_global(cBgStd),$get_global(cBgStd))
,
$ifequal(%tracknumber%,1,
$set_style(text,$get_global(cTxtStd),$get_global(cTxtStd))
$set_style(back,$get_global(cBgStd),$get_global(cBgStd))
,
$set_style(text,$get_global(cTxtTrk),$get_global(cTxtTrk))
$set_style(back,$get_global(cBgTrk),$get_global(cBgTrk))
))

// Top & bottom border
$ifequal(%tracknumber%,1,
$set_style(frame-top,1,$get_global(cFrmStd)),
$ifequal(%tracknumber%,5,
$set_style(frame-bottom,1,$get_global(cFrmStd)),
$ifequal(%tracknumber%,%album tracks%,
$set_style(frame-bottom,1,$get_global(cFrmStd)),
)))

// right border
$ifgreater(%tracknumber%,5,
$set_style(frame-right,1,$get_global(cFrmStd))
,)

,
// -- single view
$set_style(frame-right,1,$get_global(cFrmStd))
)
The Tracknumber Column
Here is the list of tasks to perform.
- White text on black background and red top frame for first track of an album.
- Black on grey for everything else.
- Red bottom frame for last track of an album.
- Dark red background for selected single tracks.
- No indication of selected tracks for album tracks.
- Dim leading zeros of album tracknumbers.
$if($get_global(isAlbum)
,
// -- Album view
$set_style(text,$get_global(cTxtTrk),$get_global(cTxtTrk))
$set_style(back,$get_global(cBgTrk),$get_global(cBgTrk))

$ifequal(%tracknumber%,1,
$set_style(text,$get_global(cTxtStd),$get_global(cTxtStd))
$set_style(back,$get_global(cBgStd),$get_global(cBgStd))
$set_style(frame-top,1,$get_global(cFrmStd))
,

$ifequal(%tracknumber%,%album tracks%,
$set_style(frame-bottom,1,$get_global(cFrmStd)),
))
)
The above is the script for album tracks. First setting the default black on grey colours, then modifying these for the first track and setting its top frame. The second $ifequal() takes care of the bottom frame for last tracks. Below you can see the complete script including the colour settings for single tracks.
$if($get_global(isAlbum)
,
// -- Album view
$set_style(text,$get_global(cTxtTrk),$get_global(cTxtTrk))
$set_style(back,$get_global(cBgTrk),$get_global(cBgTrk))

$ifequal(%tracknumber%,1,
$set_style(text,$get_global(cTxtStd),$get_global(cTxtStd))
$set_style(back,$get_global(cBgStd),$get_global(cBgStd))
$set_style(frame-top,1,$get_global(cFrmStd))
,

$ifequal(%tracknumber%,%album tracks%,
$set_style(frame-bottom,1,$get_global(cFrmStd)),
))

,
// -- Single view
$set_style(text,$get_global(cTxtTrk),$get_global(cTxtSel))
$set_style(back,$get_global(cBgTrk),$get_global(cBgSel))
)
Still the dimmed leading zeros are missing. Because we cannot access individual characters on the Style tab we must implement this feature into the Display script.
$if($get_global(isAlbum),
$ifgreater(%tracknumber%,15,
$hex(%tracknumber%,1),
$get_global(cTxtDim)'0'$rgb()$hex(%tracknumber%,1)
))
Into the existing script insert $get_global(cTxtDim) at the position shown above. This overwrites the Style tab settings and sets the text colour to the desired light grey. After the leading zero insert rgb() to revert to the Style tab defaults. Note that on the Display tab changing the background colour is not possible.
The Track Column
This is what needs to be done for the Track column.
- Black text on grey background by default.
- White on black and red top frame for first track of an album.
- Red bottom frame for last track of an album.
- White on dark red for selected tracks.
- Red text for artist names of a VA album.
$set_style(text,$get_global(cTxtTrk),$get_global(cTxtSel))
$set_style(back,$get_global(cBgTrk),$get_global(cBgSel))


$if($get_global(isAlbum)
,
$ifequal(%tracknumber%,1,
$set_style(text,$get_global(cTxtStd),$get_global(cTxtSel))
$set_style(back,$get_global(cBgStd),$get_global(cBgSel))
$set_style(frame-top,1,$get_global(cFrmStd))
,)

$ifequal(%tracknumber%,%album tracks%,
$set_style(frame-bottom,1,$get_global(cFrmStd))
,)
)
This is the complete script. The first two $set_style() define the default for normal and selected tracks. With the first $ifequal() we take care of all the first album tracks, changing text and background colour and adding the red top frame. The second $ifequal() adds the bottom frame on last tracks.
As for the dimmed zeros in the tracknumber column, the red VA track artist display is a task for the Display column.
When I was building the design those different colour artist namens turned out to be ever troublesome. The usual light background of the column requires a quite dark red. I chose the one also used for selected lines. Of course, that meant using a different red on selected lines. Otherwise the artist name would just disappear. That could easily be taken care of by using the advanced six-value version of the $rgb() command. The next problem lay in the black background track #1 lines, that made the introducing of a second colour variable necessary because the initial red was too dark on black. So we have cTxtVA as default and cTxtVA1 for first tracks of an album, which results in this script.
$if($and($get_global(isAlbum),$meta(album artist)),
$ifequal(%tracknumber%,1,$get_global(cTxtVA1),$get_global(cTxtVA))
[$meta(artist)' - ']$rgb()
)

%title%
The $ifequal() checks for the first track and sets the colour accordingly. The $rgb() after the artist display reverts back to the Style tab defaults.
The Time Column
The Time column is easier than the previous ones.
- White text on black background and red bottom frame for everything.
- Red top frame for first track of an album.
$set_style(back,$get_global(cBgStd),$get_global(cBgSel))
$set_style(frame-bottom,1,$get_global(cFrmStd))

$if($get_global(isAlbum),
$ifequal(%tracknumber%,1,
$set_style(frame-top,1,$get_global(cFrmStd)),
))
Not much to say about the script. It’s quite straight forward. The first two lines set background and bottom frame colour. No need to worry about text colour because it’s not different from the global defaults. The rest of the script first checks for an album, then for the first track and displays the top frame.
The RGain Column
Our replaygain column is another easy one. These are the tasks:
- White text on black background and red right frame for everything.
- Red top frame for first track of an album.
- Red bottom frame for last track of an album.
$set_style(back,$get_global(cBgStd),$get_global(cBgSel))
$set_style(frame-right,1,$get_global(cFrmStd))


$if($get_global(isAlbum),
$ifequal(%tracknumber%,1,
$set_style(frame-top,1,$get_global(cFrmStd)),

$ifequal(%tracknumber%,%album tracks%,
$set_style(frame-bottom,1,$get_global(cFrmStd)),
))
)
First we set the background colour. Text colour is the same as the global defaults. The next line defines the right frame. After that we check for an album and set top frame for the first track or bottom frame for the last track.
Done
The general colour scheme is finished. You might have noticed that until now Foobar2000 does not indicate the currently playing song in the playlist. That is the task for the following chapter. Right now your Foobar2000 should look similar to this screenshot.

When the individual column colours don’t show, before delving into the scripts themselves make sure that for all columns the Use custom color spec option is ticked. You can also download the FCS file: Dark Connections, Stage 2.